

Sometimes, things can go from bad to worse when you deal with data. It is easy to accidentally delete important documents, videos or photos. So, what do you do if you accidentally delete it once in a lifetime captured on video?
Don’t worry, tech to rescue again. That’s why you like to have this life saver of a program in your arsenal.
This free data recovery software is designed to recover lost files from hard disks, CD-ROMs and digital camera memory (Compact Flash, Memory Stick, Secure Digital / SD, Smart Media, MicroDrive, MMC, etc.). .
File recovery software for recovery
Photorek Ignores the file system and follows the underlying data, so it works even if your media file system is severely damaged or reformatted. In most cases, Photorek can recover the entire file without any problems.
Note: Do not save any files on your computer after you notice that the photo or document is missing or accidentally deleted. Saving files will overwrite your hard drive with more information, making it even harder to recover a deleted file.
Photorek works by merging through your hard drive, looking for data bits that make up a deleted document or photo. When all the bits of information have been collected, Photorec can reassemble them and voila reunite your document.
Remember, if the item’s data is not retrieved enough, it will be lost and even Photorek will not be able to retrieve it. It is important to stop all of you to get it back the moment you find your item is gone.
This means that when you run Photorex you have to send the extracted data to a different storage device than the one you are looking for because the data you are looking for will be overwritten and corrupted.
Download the instructions
To download the program, Click here To navigate to the Photorek download page. Once there, click Download Link in the top left corner, and then click on the large green button labeled “TestDisk 7.2 Free Download. ”
Note: Photorek is paired with a program called TestDisk, which recovers lost partitions and reboots non-booting disks. To use the testdisk, you can learn how to do it Step-by-step instructions here.
When the download is complete, extract the files from the zipped folder. After you have collected the files, open the folder and find the PhotoRec_Win application.
Before you proceed, you must create a new folder on your desktop to place the recovered files in PhotoRec. Label something as easily identifiable as “PhotoRec Recovered Files”.
When you first run Photorex, do not despair. I know this stripped-down program is scary, but you can recover the files you need without risk if you follow the step-by-step instructions.
You need to use the arrow keys and the Enter button to navigate after opening the program. The first screen shows the drives available for scanning. It also has USB and connected external drives if plugged in.
Your first screen will look like the image below.
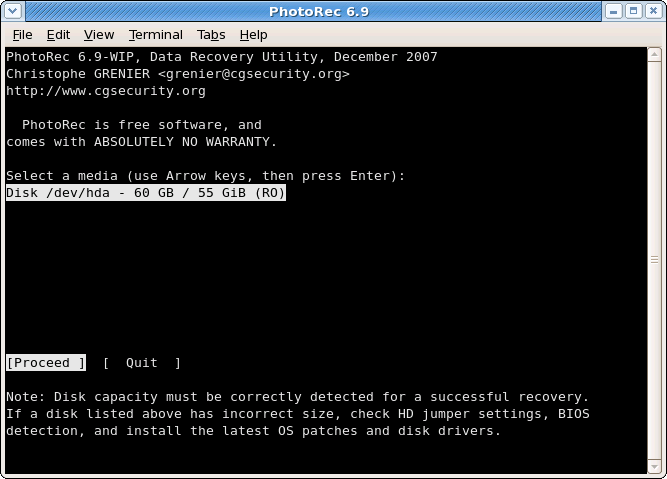
Using the arrow keys, select the drive you want to scan and tap Enter Button to select. Scanning the partition of the storage device instead of the whole thing is faster.
Once the drive to be scanned is selected, like your camera storage card, Photorek needs to know the file system type it is searching for. This defaults to the “Other” option, and we recommend using the default option if you do not know that your system is of a different type.
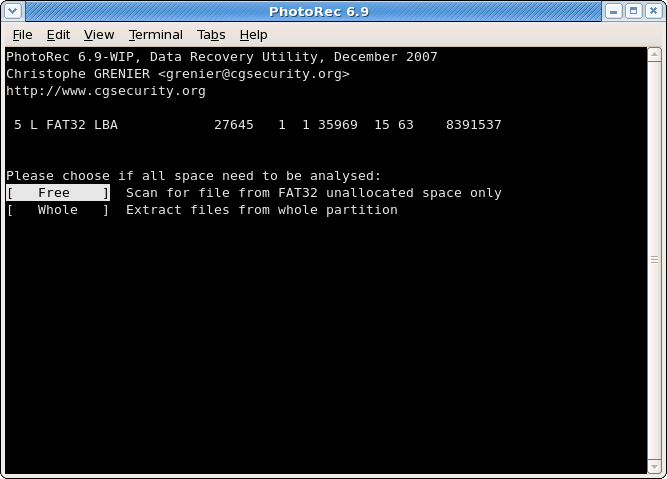
When you get to the screen that says “Please select if you need to explore all the space”FreeOption to scan only NTFS unallocated space. This means that Photorec searches for recently vacant spaces for photos or documents lost due to accidental deletion.
It looks like the image below.
The next screen prompts you to select a drive to send the recovered files to. Use the arrow keys to scroll up and down the list and press the left arrow key to go back to your main hard drive – C: label to access any folder.
You need to navigate back to yourself C: Drive and go Documents and settings > Desktop To find the folder you created on your desktop before you start Photorek. When the correct file is found, “C”On the keyboard to make your choice.
Photorek will start scanning the selected drive immediately. There are usually a lot of files to scan, so it takes 15 to 30 minutes.
This is normal, let photorec scan without interference. If you think the scan will take more than a few hours, you may inadvertently choose to scan your computer drive or the undivided drive on your computer.
If so, press Enter Turn off the Photorek process and return to the main screen.
Note: If you have any problems with the program, you can see FAQ page Or Step-by-step page here.

Beatrice Ashford is a contributor at Nintendo-power.com, covering a wide range of topics including news, politics, business, technology, sport, entertainment, and lifestyle. She focuses on delivering clear, balanced reporting and useful information that helps readers stay informed about current events and emerging developments. Her work highlights stories that matter to everyday audiences, with an emphasis on accuracy, relevance, and accessible journalism that keeps readers connected to the issues shaping the world around them.